How to Inspect New Filter Plates Before First Startup
A new filter plate can look correct in the crate and still fail on its first cycle. Visual checks confirm that the right item arrived; they do not confirm that the plate will seal against its neighbours, seat on the side bars, and form the chamber depth the press was designed around. Those conditions only appear under clamping pressure, which is why the inspection has to end with a dry clamp and a recorded set of measurements rather than a signed delivery note. This guide separates the quick identity checks from the acceptance checks that decide whether a plate is fit to install, and sets out what to write down so a later problem can be traced back.
Why a Plate That Looks Right Can Still Fail on the First Cycle
A filter plate does three jobs under clamp, and a visual check confirms none of them. It carries clamping force through its sealing rim into the neighbouring plates, it sets the chamber depth that the cloth and cake occupy, and it drains filtrate from across the whole plate face. A plate can look correct and miss any one of the three.
Moulding flash on a sealing rim, a small void at a corner, or a particle of grit trapped on the rim holds two faces apart. The gap is invisible at atmospheric pressure and becomes a leak path once slurry is pumped in. Warping behaves the same way: a plate that rocks on a flat surface sits proud in the stack, and the joint beside it weeps when the press closes.
Chamber depth is the quiet one. A stack built from plates of two different depths, or from one plate that does not match the drawing, creates chambers of unequal volume. Feed distributes unevenly, one cloth is stretched further than its neighbours, and the cloth on the shallow chamber takes the load first. None of this is visible from the walkway.
Receiving checks answer a narrow question: is this the plate we ordered? Acceptance checks answer the one that matters: is this plate fit to run? Most of the failures above are missed because the inspection stops at the first question, and the plate goes into the press with an assumption attached.
What to Have Ready Before the Crate Is Opened
The inspection is only as good as the reference it is compared against. Settle these before the packaging comes off:
- The approved plate drawing, at the revision that was ordered. A drawing without a revision number cannot settle a dimension question later.
- The order and packing list, showing quantity, plate type, and, on a membrane press, how many membrane plates against how many chamber plates.
- The stack plan, showing the position each delivered plate is meant to occupy.
- A clean, flat area to lay plates out, plus a steel rule, calipers, a straight edge and a camera.
- A receiving record with a row per plate, not a row per shipment.
The last two are the ones usually skipped. A single line reading “twenty plates received, OK” tells you nothing six months later, when a leak appears at one joint and nobody can say whether that plate was checked on arrival.
Handle plates as little as possible before installation. A thermoplastic plate stood on edge on rough ground, or stacked under other plates in a warm store, can distort before it ever reaches the press. Keep the protective wrapping on plates that will not be installed in this shutdown.
Identity Checks That Confirm the Right Plate Arrived
Run these on every plate before making any judgement about quality.
Nominal size tells you less than it appears to. A 1000 mm plate from one supplier and a 1000 mm plate from another can differ in overall dimensions, lug height and port position, because the nominal figure describes the press series rather than the mould. Common series run from 500 mm to 1500 mm, which is exactly why the number in the product name is not a measurement.
Chamber depth is a separate value from plate size and belongs on the same record. A stack assembled from plates of two depths will still close, so nothing warns you at the press until the cake and the cloth start behaving differently between positions.
Port layout decides whether the plate can work in your press at all. A centre-feed plate in a stack plumbed for corner feed blocks the feed path, and a filtrate outlet that does not line up with the press outlet leaves that chamber undrained.
Lug and handle dimensions decide how the plate hangs on the side bars. A lug a few millimetres tall or short lets the plate tilt, and a tilted plate loads its sealing rim unevenly against its neighbour.
Plate type and mix matter most on membrane presses. Count membrane plates against chamber plates and check the position pattern against the stack plan, because the squeeze stage depends on that alternation being right.
Material marking is the last identity item. Record the material code, pressure class and temperature limit exactly as marked on the plate, and compare them with the approved specification rather than with memory or with the previous delivery.
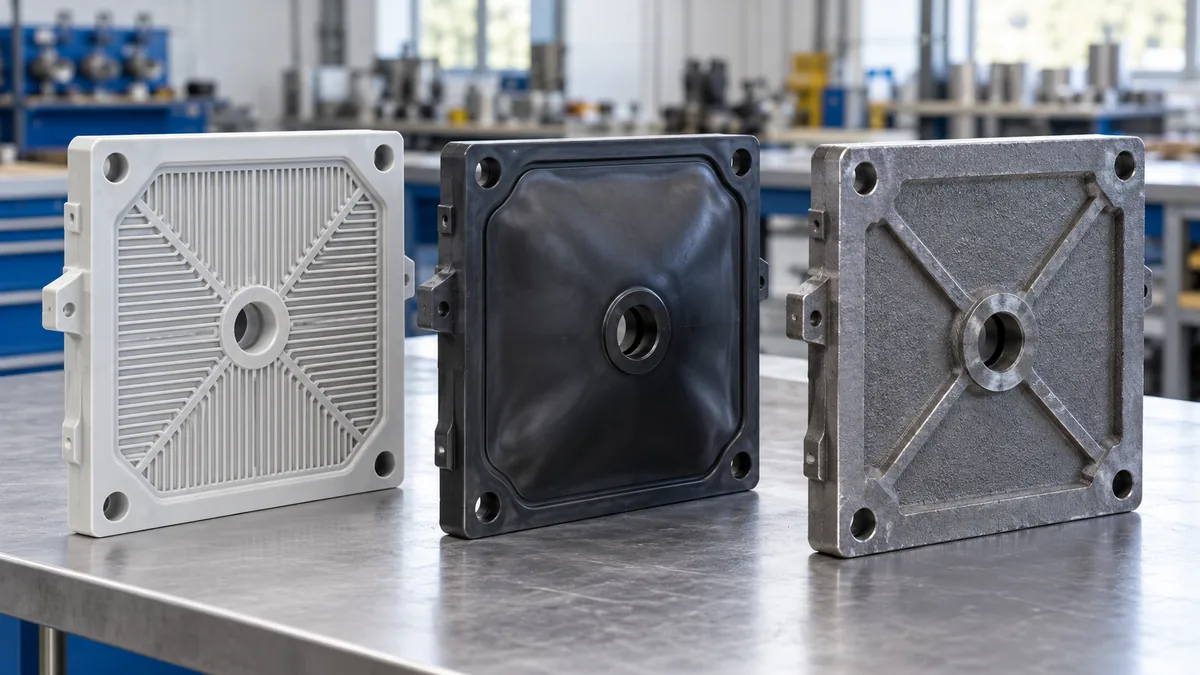
Matching the drawing on every count still only establishes that the right item arrived. What follows is the part that decides whether it is a good one.
Checks That Decide Whether the Plate Is Fit to Install
The sealing rim and the plate body
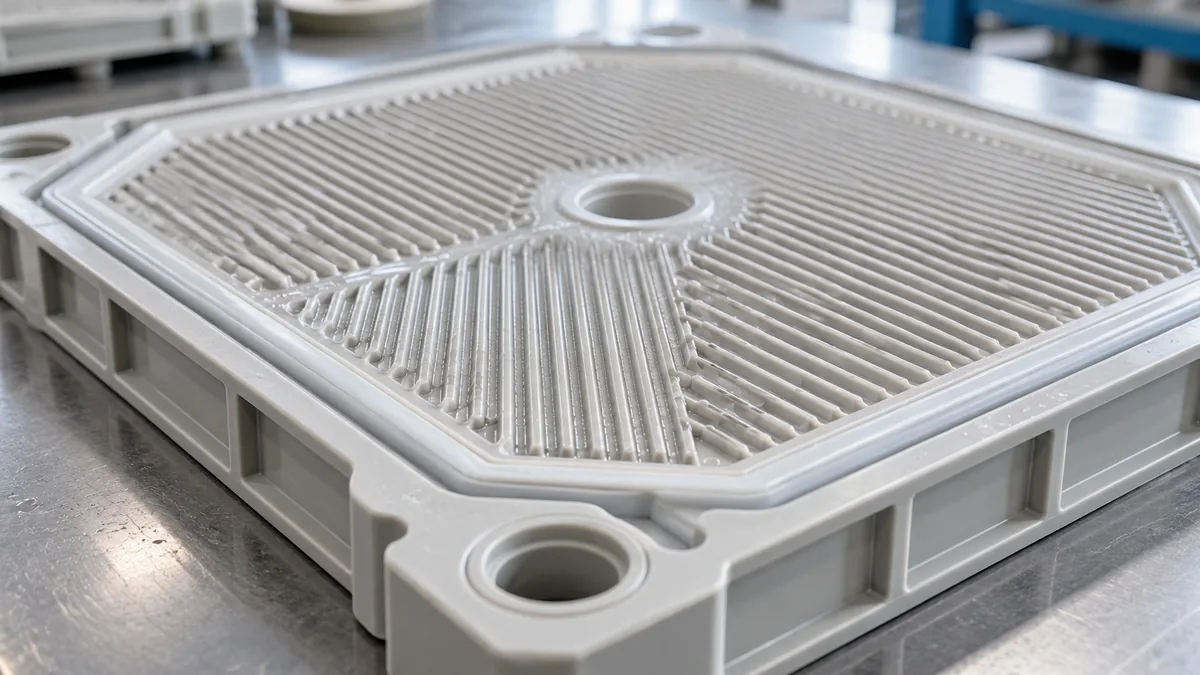
Trace the full sealing rim with a finger and inspect it under a low-angle light. Look for moulding flash, voids, and nicks at the corners. Corner areas and the region around the feed boss carry the highest stress and are where joint leaks usually begin. Dried release agent or grit on the rim does the same damage as a nick.
On the body, check the roots of the handles, the feed boss, and the area around any threaded fitting. Cast iron plates deserve a separate look for casting voids, coating condition and rust breaking through a machined face.
Flatness and seating
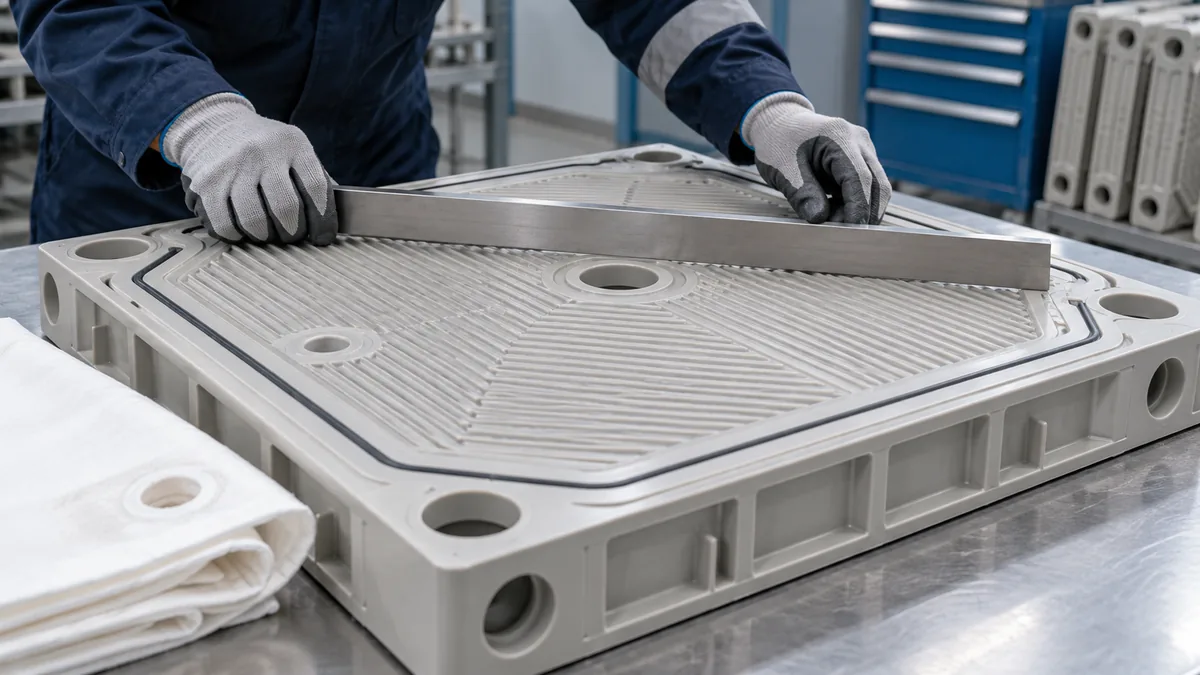
Lay the plate on a flat surface, or run a straight edge across the rim and across the body. A plate that rocks is warped. Do not assume clamping pressure will flatten it; a warped plate redistributes load into its neighbours and holds the joint beside it open. Tag it and hold it for supplier assessment.
Drainage grooves and ports
Inspect the grooves or stud pattern on the plate face and the filtrate outlet. Flash crossing a groove, or a port with material left in it, means part of the plate face cannot drain. That region holds water under pressure, the cake there stays wetter than the rest, and the plate carries an uneven load across its face. Clear any obstruction using the method the supplier approves, not a scraper that scores the sealing face.
Membrane surfaces on squeeze plates
Where the plate carries a rubber membrane, check the bond line where membrane meets plate for lifting, blisters and trapped air. Confirm the squeeze medium port is clear and its thread sound, and inspect the membrane surface for cuts and embedded grit.
One last check belongs to the process rather than the plate. Confirm that the delivered rating matches the duty you ordered it for, because a plate can sit comfortably inside its generic catalog rating and still be wrong for your press.
| Plate type | Typical catalog rating to confirm | What to check on the delivered plate |
|---|---|---|
| Polypropylene (PP) | Up to 85 °C continuous, 90 °C transient; 0.8, 1.0 and 1.6 MPa classes; pH 1 to 13 | Material code and pressure class marking against the approved specification |
| Polyethylene (HDPE) | Up to 60 °C continuous, 70 °C transient; 0.6 and 1.0 MPa; pH 1 to 14 | That the ordered low-temperature class was supplied, not a higher-rated substitute |
| Cast iron | Up to 150 °C continuous, 160 °C transient; up to 2.0 MPa; neutral and weak alkaline service | Casting quality, anti-rust coating condition, machined faces free of rust |
| Rubber membrane | Squeeze pressure 0.8 to 1.5 MPa; up to 75 °C continuous; pH 2 to 12 | Membrane bond line, squeeze port condition, membrane compound stated on the documents |
These are typical catalog figures for each plate class. The approved specification for your press governs, and the process temperature, pH and pressure should be confirmed against it before the plate is installed rather than after the first batch.
A Dry First Clamp Before Any Slurry Enters the Press
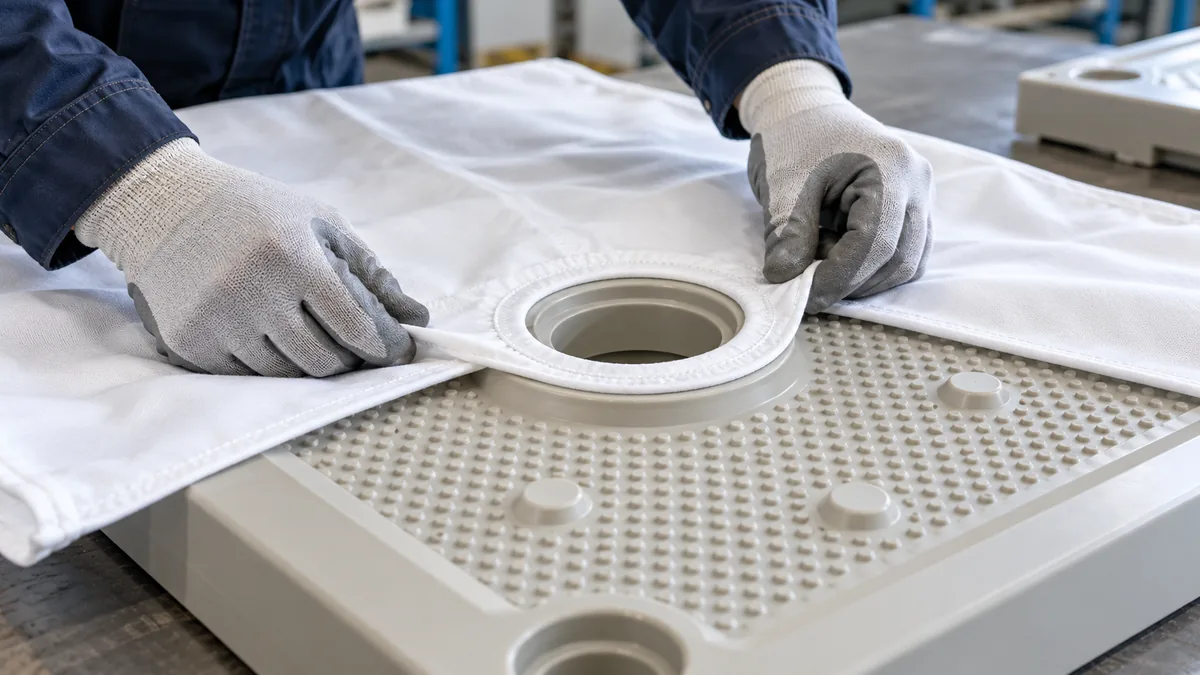
Fit cloth to two or three plates first and check how the eyelets, feed holes and outlet holes line up. A cloth that has to be stretched or folded to reach its openings is likely to wrinkle once the chamber fills, and a wrinkled cloth leaks and wears at the fold.
Then run the press dry:
- Close at low clamping pressure and watch the stack from the side. Plates should travel together and sit square on the side bars. A plate that lags, tilts, or rides up on a lug is telling you its lug dimensions or its flatness are wrong.
- Bring the press to working clamping pressure, open, and inspect the rims where plates meet. A mark that repeats at the same joint points to a high spot on one plate.
- Fill the chambers with water and raise the pressure in steps up to the working pressure stated on the approved specification. Hold at each step and walk the stack. Slurry under pressure will open any path that water has already found.
- On a membrane press, inflate the membranes with the squeeze medium at low pressure before any slurry enters. The membrane should move evenly across the plate, with no local bulge and no leak at the bond line.
- Drain, open, and check the cloths for pinching or displacement before the first production batch.

The dry clamp proves that the stack closes, the lugs seat, the cloths align, and the rims hold against water at working pressure. It does not prove filtrate clarity, cycle time, cake release or cloth compatibility with the slurry. Those need feed material, and the first slurry cycles should be compared against the water test result rather than judged on impressions.
Recording the Inspection So a Later Failure Can Be Traced
An inspection without a record protects one cycle, not the next. The purpose of the record is that a leak at position fourteen in month seven can be checked against what that plate looked like on arrival.
| Record field | What it captures | Required or optional | Why it matters later |
|---|---|---|---|
| Plate ID and stack position | A unique tag and the slot the plate is meant to fill | Required | Matches a later leak to a plate that arrived with a known defect |
| Measured dimensions | Size, chamber depth and lug dimensions as found | Required | Shows whether the plate arrived inside drawing tolerance |
| Material and rating marking | Material code, pressure class and temperature limit as marked | Required | Separates a wrong-item delivery from a wrong selection |
| Defect notes and photographs | Rim nicks, flash, warping, coating damage, with a scale in frame | Required where a defect exists, optional otherwise | Supports a supplier claim without argument |
| Disposition | Accepted, accepted with note, or held | Required | Keeps a held plate out of the press |
| Drawing revision and inspector | The reference basis, a name and a date | Required | Shows what the plate was judged against and by whom |
Photograph discipline matters more than the form. Put a scale in the frame, and get the plate ID into the same image. A closely cropped picture of a rim nick with no identifier cannot be tied to a plate half a year later.
Attach the finished record to the press maintenance history so that plate condition, cloth changes and leakage events sit in one place. When a plate is eventually replaced, this is the document that shows whether the failure was a delivery defect, an installation error, or ordinary service wear.
When a Plate Fails Inspection
Hold the plate, tag it with the position it was meant for, and keep it out of the press. Installing a suspect plate to see whether it works costs a cycle at best, and a cloth set plus a neighbouring plate at worst.
Separate cosmetic from functional before contacting the supplier. Flash on a non-sealing outer edge, a scuff in the coating away from a sealing face, or a paint run is cosmetic. A mark on the sealing rim, a blocked filtrate port, a lug outside the drawing tolerance, or any detectable warp is functional, and the plate should not go into service until the supplier has assessed it.
Send measurements rather than adjectives. A message saying the plate does not fit gives the supplier nothing to work with; the plate dimension, the drawing dimension and the difference between them do. Include photographs with a scale and the plate ID, and state which drawing revision you measured against.
Ask for the assessment method in writing: replacement, rework, or release against a documented deviation with the reason recorded. Verbal reassurance is not a release decision, and it will not be available when that joint leaks a year later.
Have the Plate Data Checked Before the First Cycle
The strongest position before startup is a plate file that matches the press: the approved drawing at the correct revision, measured values per plate, the dry clamp and water test results, and photographs of anything that did not pass. With those in hand, a technical review can separate a delivery problem from a specification problem, and a specification problem from something the press is doing to the plate.
Send the nominal size, chamber depth, plate material and pressure class, the process temperature and pH, and the measurements or photographs from any check that did not pass. Shine Technology’s technical team can compare them against the plate specification and advise on replacement, a documented deviation, or a second check before the plates enter service.
FAQ
Can a new filter plate be installed straight from the crate?
Not safely. Between crate and press there are three things a crate check cannot establish: that the plate matches the approved drawing revision, that its sealing rim and drainage paths are clear, and that it seats on the side bars and seals under clamping pressure. A short receiving inspection plus a dry clamp covers all three, and both take far less time than a failed first batch and a replacement cloth set.
What if only one plate in a set fails inspection?
Hold that plate and decide the stack question separately. If the press can run with the plate from that position left out, the remaining positions can proceed; if the stack needs every position filled, either reuse an existing serviceable plate from the same position or delay that stack. Substituting a plate of a different chamber depth to keep production moving creates the unequal-chamber problem the inspection was meant to prevent.
Do membrane plates need different first-startup checks?
Yes, in three respects. The membrane bond line and surface need their own inspection for lifting, blisters and cuts. The squeeze medium port has to be clear and its thread sound. And the membranes should be inflated at low pressure before any slurry enters, so that uneven movement or a bond-line leak shows up while the press is still clean. The alternation of membrane and chamber plates should also be checked against the stack plan.
Is a water test enough before running slurry?
It proves the stack closes, the lugs seat and the rims hold at working pressure, which is the most expensive failure mode to discover later. It does not prove filtrate clarity, cycle time, cake release, or that the cloth suits your solids and chemistry. Those need feed material, so treat the first slurry cycles as the next stage of the same test and compare them against the water test baseline rather than against memory.
How should a plate be stored between delivery and installation?
Flat, wrapped, and out of direct sun, on a surface that supports the whole plate rather than two edges. Thermoplastic plates are heavy and soften at moderate temperatures, so stacking them under load or standing them on rough ground can introduce the distortion your inspection is trying to catch. Inspect again if a plate has been stored for a long period or has clearly been moved between locations.